Tuesday, February 21, 2012

The Curious Case of Benjamin Button


So what have I been doing since my last post? I was writing about a Red Riding Hood cane that I was working on. Well lets just say several pounds of clay and many hours later it is done. And I am not happy with it. I could write about that failure but instead I thought I'd write about a different failure. It started with Clay Carnival in Vegas last November. I knew I was taking a class from Leslie Blackford. I just love her and her classes but I never seem to finish in her class. I work slow I can't help it. So I decided to work on my "Mad Hatter" before I got there. I had had help with some sculpting from a friend, Maggie Westall, and I was really happy with my mad hatter head. I took this with me to Vegas but even with this finished before class I still didn't complete my box until I got home. Here it is. So after I got home I started working on my red riding hood cane. After that failure I was tired of caning so I thought I'd try to sculpt a woman. Not sure what the final was going to be I just started on the head.
This first head was made with premo right out of the package. It was small and I thought not too bad for a first attempt. (actually I had done a little sculpting of Santa's in the past. Hmm... maybe that's why they were all turning out too masculine) So my first thoughts on head 1 was I hated the eyes. I tried painting them on and they pretty much looked like crap. The other thing thing was that my head was far from the beautiful woman I wanted, but it was my first try.
I did some research on the web and came up with some eyes that were prebaked that I could insert into the head. Head 2 has these eyes in them. Now when I start sculpting I do like the books and video's say and mark off the eyes (mid way down) the nose and mouth areas. What happens for me though is that while I am working it the head becomes misshapen and ends up looking like Benjamin Button. ( and I don't mean the handsome Brad Pitt version) So here is head 2.
Head 3 is a little less Benjamin but still not right. For some reason Head 4 went back to Benjamin. Head 4 has slightly different eyes. These I coated with resin that hardens in the sun. This is the best part about head 4. She is still no beauty. I also switched to a mix of translucent and beige Kato clay. This cracked when I took it out of the oven.
Head 5 and my last attempt has some improvements but the shape is still not right. Like the last one there were cracks in the clay. Still not much of a beauty. I penciled some eyebrows just to see if it would help. Not much.
I guess it is back to caning for me.

Wednesday, January 4, 2012

Thin Is Great For People - Not for Canes


I have a wolf update for you. So I remade my wolf cane. This time I gave up on the play dough and filled with a background. Now I decided to keep the cane thin like last time. This made the cane much easier to make but not easier to reduce. I was really feeling optimistic since the reduction of the previous wolf went pretty well. Well not so much this time. I packed the cane with scrap clay as before but it just didn't go well. In the picture you can see all the sections of cane that have the gray scrap clay coming through. There was 10 ounces of clay in the original cane and I ended up with 3 ounces of usable cane. Oh the waste. Oh well. It is what it is. At least I have enough for my Red Riding Hood cane.

Monday, January 2, 2012

First Lesson for 2012 - Don't Be Stupid


Happy New Year everyone. As we tend to do each year I came up with some new resolutions. One seems to be the same every year - lose some weight. Another for me are to update this blog. I really need to update the slide show that appears on the right. My flickr pictures are all old so I need some work there.
I have a lot of ideas for canes this year. I thought I'd do some with a fairy tale theme. I love the new show on ABC "Once Upon a Time". So I have a preliminary sketch and I dive into the clay. (This also keeps my hands away from the food!) I spend most of the first day of 2012 working on a section of the cane. It is of a wolf that I hope to work into the larger "Red Riding Hood" cane. Trying to figure out how to do this I decide to keep the cane very shallow. It is between 1/4 to 1/2 inch deep. This allows me to cut into the clay using an exacto blade. Everything is going fine. I build the cane.
Then I get stupid. I really don't know exactly how this segment is going to fit into the whole cane so I have this brilliant idea to use the play dough technique. If you haven't tried this before, this is where you wrap the cane with play dough, reduce the cane and then remove the excess clay. I stupidly thought I would be able to fill in the reduced wolf with the selected background color later. You can see the play dough is the orange around the wolf. The cane measure 9 X 4 X 1/2 inches. I pack the entire clay with scrap clay. This is necessary because of the shallow depth of the cane. (at least it is necessary for me)
The good news is that I learned that I can reduce a cane this shallow but the bad news is that I learned that it will be too hard to repack the reduced cane later. The play dough did work great so I will keep that in mind for future projects. I may try baking the wolf pieces and see if I can slice off the baked clay. I have a little bit of the cane still encased in scrap clay that I should be able to slice off, soak off the play dough and then use for something.
I have to start the cane over but I did learn some lessons today. Stay tuned and I hope to post more about my Red Riding Hood cane.

Wednesday, November 2, 2011

Grand Mama What Big Eyes You Have


I never knew my maternal grandmother but I always loved this little pin that belonged to my mother. It was a picture of my grandmother when she was just a girl. I also always wondered why she didn't pass on her good looks and peaches and cream complexion to me. I decided I would try to do a cane of her. Like most of my canes it was not an easy thing. I have talked about my recent frustration with the inconsistency of clay. I happened on some Fimo classic on sale and bought up a bunch of cream colored clay. I liked the feel of it in the package but I wasn't sure how it would do mixed with my Kato. I did some preliminary testing and the color seemed to be OK after baking and it also took the higher Kato temperatures. I liked working with it. The clay was firm but would stick together when I wanted and yet I could pull it apart for "surgeries" that were required. Of course the big test will be when I try to reduce this "mother". (pun intended) I will let you know how it goes with the reduction.


I built the cane in six sections. You can see them all together as slices in the one photo. On previous mosaic canes my extruded pieces were made up of combinations of color. I decided to extrude individual colors to maintain the more muted palette of the pin. I don't think I quite captured her beauty but I hope she is looking down and appreciating the effort her granddaughter made.


Not sure of the market value of this cane but since I don't sell too often I guess it won't affect my pocketbook too much. Of course everyone in my family can expect something made out of it for Christmas whether they want it or not.


Thursday, September 29, 2011

Like a Proud Parent


I started this post about a month ago. (as it was recently brought to my attention) I was going to try to post from my Ipad. I couldn't figure out how to post pictures from my ipad so the first word was as far as I got. Then my Ipad decides to keep losing wireless. UGH!! So I am back to my computer to try to finish this post.


As I was saying.....I felt like a proud parent after my face cane class that I gave to my local guild. They all did such a good job I thought I'd post some pictures. That isn't to say my other students haven't done as well, but I was just slack about taking pictures. Now a good parent would remember whose canes these are....I think one belongs to Sharon Sully and the other's Cheryl Smith. I apologize if I got this wrong and I am sure I will hear about it.


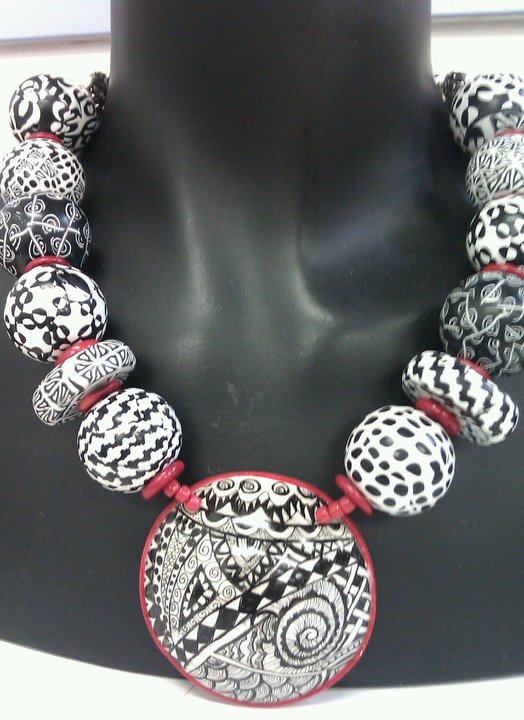
The black and white necklace picture was sent to me by Kim Koval Keane who made it after purchasing my book, Classic Clay. I thought she did a great job. She also has some Zentangle pieces that are really nice.


I am planning on going to the opening at RAM in Racine in a few weeks. Since I am the NPTIPC I knew I had to make a stupendous piece to wear. This is also so that the museum people recognize my great talent and insist on putting a piece of my work in their museum. (We can all dream can't we?!) I hope to have pictures up soon.

Sunday, September 18, 2011

Friday, July 22, 2011

A Frame is Worth a Thousand Words?


Geeesh! It's been since May 1st since I posted. I better get on the stick or I will lose the multitudes (well... the 200 plus) who follow this blog.


I have to say I have been busy at least. I took a 16 day cruise which started in Rome, went around Spain and ended in France. Had a wonderful time and actually got inspired. (not hard to do) Here is a picture of a cathedral in Florence, Italy. I was inspired by the many layers/moldings. Not sure what the architectural term is. I thought that I would give them a try for some of my mosaic faces. I like the way they turned out. It took several steps to make them.


First I had to make some canes. Now I wanted them to be detailed but I knew I was going to reduce them down so it was a challenge deciding the right amount of detail so that all the work could still be seen at the tiny size. Of course some of it is lost but I think of it like my eyeballs in my faces, I know it's there and I convince myself it adds to the cane. I have some books on renaissance designs and borrowed from there for some of the designs. I need to add to my stash of canes if I keep this up.


I made each "frame" separately so that I could sand them before putting them together. I put them together (another baking) I added canes along the sides of last frame. (another baking)


Added the back (another baking) and then sanded again.


As I said I liked the way they turned out. They are a little thick and I may try to scale them down some more.


I have to go condition some clay for a face cane class I am giving my local guild this weekend.


Until next time.