Wednesday, February 24, 2016

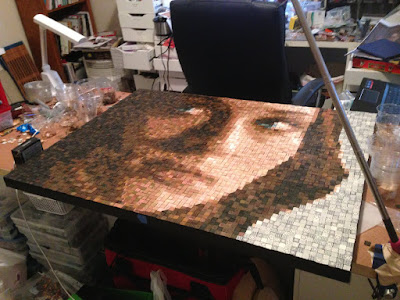
Mosaic portrait of actress Sophie Turner


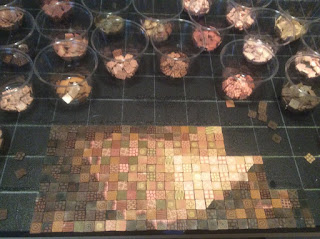
I was watching my favorite TV show, Game of Thrones, when I was intrigued with the face of the actress Sophie Turner who plays the character Sansa Stark.  I took a screen capture with computer and knew that I had found my next portrait.  This was going to be a challenge for me since it was the first time trying to do a portrait of this kind in color.  The finished dimensions are 40 X 30 inches.  I lost count of the number of canes that I made for this but I'd guess around 50, not counting the gray toned background tiles which were left over from my son's portrait.  I'd say at least 5 pounds of clay and many, many, many hours of labor.


Broke out the food process when face this this much clay to condition.


Some of the canes I created for this portrait.


All of the canes had to be reduced to the same 1/2 inch

Then the canes are sliced, baked and sorted.

Video of the process
click below

https://youtu.be/_wtvHAw3WUM
I took the following pictures and posted to Facebook.  There was much debate over who it was.  The guesses ranged from Obama to Scarlett Johannsson.  Gillian Anderson was a popular guess but her identity was revealed when someone suggested Sophie Turner. (it probably didn't hurt that the guesser knew I was a big fan)


Sunday, January 4, 2015

Developing A New Class


Happy New Year everyone.  It is hard to believe that it is 2015.  I think it is a good sign that it seems the years go by so fast.  I can remember back in school when an hour took forever.  (And I was one of those kids that actually liked school)  This is the time of year that I apologize for not posting more and promise to do better in the future.  Hmmm.....sorry about that.  I also said I was going to lose weight and that has happened either. Oh well that is history lets move forward.


I am happy to report that I will be teaching at Maureen Carlson's artist retreat in Jordan Minnesota this June. (Click here to go to Maureen's website)  I will be teaching two classes, a landscape caning class (3 days June 10 - 13) and a framed pendant class (2 days June 15 - 17).  This may be the last year that Maureen will have artists coming to her studio so I thank her for letting me have this opportunity.  The class size at Maureen's are small which makes it a fabulous opportunity for learning.  You should check out her classes and definitely go if you get a chance.  If not my class then one of the others she has offered.  I plan on taking Diane Keeler's Alice In Wonderland doll class. 
I enjoy teaching and I wish I did it more often.  I have taught my face cane class several times and have been one of instructors at Donna Kato's Clay Carnival in Las Vegas.  These are different categories of classes.  The face cane class I consider a master caning class.  It can be done in two to three days but this is an intense class for the experienced caner.  Clay Carnival is for all experience levels and usually a four hour class.

For the post today I thought I'd take you thru my process of coming up with a new class to teach at Maureen's.  Maureen and I had talked briefly about it and thought a landscape class would be a good idea.  I have taken a lot of classes and continue to take classes.  I am of the thought that the best class gives you a good foundation to take home and then build on what you have learned.  Generally not a project oriented class.  Now if you know me you know that finishing things is not my strong point so that is probably where this opinion comes from. Designing a good class is an art unto itself.  My friend Jana Roberts Benzon is particularly good at this.  She is constantly coming up with new techniques, designs and projects.

For this new class I knew I wanted to make a landscape and I knew it needed to involve cane work.  My first thought was to make four canes of the seasons.  I drew up a sketch and started working on the first "winter" cane. 


OK this is where the problems start.  I wanted this class to be for all skill levels.  After completing the "spring" cane I knew that this class wasn't going to work.  It was just too difficult.   I liked the canes and I hope students would too but I didn't want frustrated students.  I also felt that it wasn't as good a "foundation" as it was a project.  Guess it was back to the drawing board.


My sister and I went to Euro Clay Carnival which was held in Madrid, Spain.  We toured the country a little prior to carnival.  I was inspired by the landscapes with the rolling hills covered with olive trees.  I could see each hill as a different cane.  I took this inspiration and decided to build a cane that was made up of other canes.  Here is the cane I built for the class.


 For this class students will learn to build several canes.  We will discuss some of the elements that go into making successful landscape components so that they can create more once they return home.  We will talk about color, design, depth, texture, perceived movement and feeling, size and scale.


For the two day class I will teach my framed pendant class.  If students stay for both they may want to use the landscape cane that they just finished so I came up with this pendant.  Students will create many canes for this class too.  Here the topics will be more on what goes into the best micro canes.  These canes will be reduced very small.  I will teach my "brainless" cane that is very easy to do but can give stunning results.  Color themes will be up to the students.  I have found that starting with a blue and white palette is a great way to not fret over color selection and concentrate on design.  These "delft" patterned pieces are beautiful.  Here are some of the pieces I have created with my "framed pendant" technique.


I hope to see you in Minnesota!

Wednesday, August 20, 2014

Hola Señorita. Or........ What Was I Thinking?


I have two titles for this post.  The first, Hola señorita, because I want to pay homage to the country of Spain that I will be visiting soon.  The second for my mistake of using a skinner blend in the background and worse trying to add to it.  This post is about how I fixed my screw up.

In about a month my sister and I will be heading to Madrid, Spain.  I will be attending my first EuroClayCarnival.  If it follows the format of Clay Carnival here in the states there will be an evening of "inchie" swapping.  I will be honest I don't usually put this much effort into my inchies but with the trip to Europe it felt special so I wanted the inchies to be special too.  I came up with this drawing for my flamenco dancing woman.


I went about making my cane.  I didn't have a real purpose in mind other than my inchies so I made the cane very short, about an inch in height.  I didn't want endless amounts of cane when all was said and done.  Then I came up with the brilliant idea to have the background be made using a skinner blend.  This gave the appearance of a spot light on the dancer.


I was really liking the way this cane was turning out.  I started thinking that I would really like to take some of this cane and add a skirt to it.  It was about this point in the building of the cane that I stumbled on the web page of artist Adam Thomas Rees.  For his self portrait he cut up his completed cane into sections and then reduced the sections separately. (Here is a post about him in Polymer Clay Daily) Now I very often take parts of my cane and make it larger and then reduce that section to be worked into the final cane.  I had to do this with her hand in order to get the detail of her fingers.  I should have realized that this wouldn't work too well since I didn't create the whole cane. Then throw in the problems that arise from working with a skinner blend in a cane and I should have known I wouldn't be happy with the results.  But hey thinking is not my strong suit.  I pressed on.  I reduced the completed square cane, put some aside for my inchies and started on her skirt.


After putting the two sections together I reduced the cane down to about 1 by 2.5 inches.  Here is the whole enchilada.  :)


You can see where the join of top and bottom just don't meet up as well as I'd like.  So what to do now.  I decided to take the if you can't beat 'em join 'em tactic and slice and adjust each cut so that bad join lines seem intentional.


This will require cane slice manipulation for each piece but it will make the finished piece so much better.  At least to me it does.  Here is the sanded and buffed completed piece.  Now to figure out what to do with the rest of the cane.


Tuesday, August 12, 2014

Mommy and May Update


In my last post I wrote about using the extruder for my latest portrait. I didn't go into detail of what I did with the extruded pieces.  I have been trying to come up with a way to create depth in my mosaic pieces.  It has been difficult to come up with something because of the mechanics of it and the sheer number of pieces involved.  I don't mind a challenge but it has to be able to be completed in my lifetime.  I decided what I would do would be to mount the pieces on separate sheets of clear plastic.  I then had to decide how to break up the colors. At first I thought I'd put the lightest colors on the foremost sheet of plastic and the darker towards the back.  This would make sense since the lightest would probably be the raised parts.  I decided against this because of the difficulty of construction.  I knew it would be easier to have a greater change in color scale while I was placing the pieces. 
I came up with four sheets with each sheet having four to five colors on them.  Of course it was a @#$% (bleep) getting them lined up but no one ever said it would be easy.  It was another one of my artistic leaps of faith because I had to finish it before I knew whether it would work. 
Here are some of the individual sheets and a little movie I made to help illustrate the depth effect I was going for.


I would like to say that my Mommy and May project is complete but the truth is I still need to mount her permanently.  I also want to add some mats.  Because of the problems of the reflections I had to bring out my huge photo cube that I got when I bought my photo lights.  The cube pops out to be about 4 feet square.  I was then able to put the whole picture inside the cube.  I then draped the opening of the cube with black fabric. This covered over the camera that was set on a tripod.  I then used the remote shutter release to take the picture.  This way I wasn't there to be reflected in the glass or the plastic.  And voila no reflection.

I am ever going to repeat this process I think I would mount the pieces on glass rather than plastic.  This way if I made a mistake it could be scraped off.......Yes, I know it may come as a shock to some but I do make mistakes.

Thursday, June 19, 2014

"Mommy and May" or" How I Learned to Love the Extruder Again"

For my latest project I am going to do another portrait.  This time it is of a friend and and her new born baby, May.  I have been wanting to do a duo portrait and since my children haven't given me any grand children (although I remain hopeful) I had to borrow from my good friend.  I think the photographer (I have her permission to use this photo) did a wonderful job and I knew when I saw it that I wanted to see if I could capture this in clay.  


For this project I knew I wanted to go back to the extruder.  I would need around 4000 pieces to complete this picture.   Today's post is all about the czextruder.  This is the new extruder that comes from Lucy tools in the Czech Republic.  Here is a link for the site in Europe.Lucy Tools.   The distributor here in the USA is Kimi's jewelry and gifts.


I bought an extruder from Kim quite awhile ago.  To tell you the truth I didn't love it.  I had put it aside and pulled out my handy green makins if I needed anything extruded.  My last portrait of my son Kevin wasn't extruded but I planned on using the extruder for my latest portrait.  I knew I was going to be cranking out a lot of extruded pieces I thought I'd give  Lucy's another try.  I am glad I did.  I had much better results this time and I owe it all to this little jar of lubricant.


Now it's been a while since lubricant gave me such pleasure, but that's not a story for this blog.  How can lubricant be so great in this instance is that it makes the czextruder work like it's suppose to.  When I first tried the extruder I found three major problems.
 
  1. It was very hard to hold in your hand.  I tried putting it into a vise but I was afraid I was bending the barrel.
  2. When I tried using the drill with it, the end cap got very hot and I had to work the drill very slowly.
  3. While using the crank I found that the end cap would tighten up to the barrel so much that I had to use pliers to get the cap off.  And I times I was afraid it wouldn't come off at all.
 
As I said I had purchased my extruder from Kim.  I also bought the conversion from the T-handle to the crank handle.  Kim knew of my massive extruded projects and also included the newer model.  Now to be honest I never figured out which is the newer model but I knew I had both a crank type and a T-handle version.  The crank version is the one that kept getting the end cap stuck so I haven't tried it again.  But I did give my pink T-handled extruder a try.  Armed with the small jar of lubricant (I applied some lubricant to the long screw shaft of the extruder) and another important addition -  the extruder vise, I gave it another go.


I frankly don't see how you could use the extruder without this little clamp.  I just screwed mine into a piece of wood and then clamped the wood to my work table.  I started out slowly using the T-handle to extrude my clay.  I then got brave and pulled out the drill.  SUCCESS!


I sometimes have to use my pliers to take the extruder off of the vise but it's not that hard.  The one thing I still don't like about the czextruder is that the "plunger" is a separate piece.  This means that you have to take the whole thing apart every time.  there are times that I may only want to extrude an inch or so of clay.  Well you can't just back up the extruder and inch and load the clay.  The plunger will not back up into the barrel since it is not attached.  Here is a picture of my extruder ( I have the larger one), my clay ready to go into the barrel, the separate plunger, the T-handle and the other item I recommend purchasing, the cleaning brush.


To help clarify here is a picture of the crank handle version.


Now I need to get back to work on my portrait.  Here are some of the containers that I have filled with slices taken from the extruded clay.  Wish me luck.....